Simple Saturday Prep: A Toad House

 Let's help our slimy green friends find a nice cozy place to call their very own, shall we? Tomorrow how about you and me make a Simple Saturday Toad House? Want to?

Here's what we need to erect a curved roof over our hoppity buddy's head. Rummage around to find a small clay flower pot. We'll also need some acrylic paints and a small paint  brush to make a pad for our toad.

The next important thing we need is to find is a soggy, damp, very well shaded, buggy habitat to place our soon-to-be-made Simple Saturday Toad House. Today, take a stroll and find just the right spot to build a shelter for one of our green pals.

Until tomorrow. Hoppy Friday!

Simple Saturday: Spiromania!

 You might think that the items featureed here are simply a .pdf print out, some colored pencils and an every-day-old-ruler. Oh, no...no...no...my friend...you could not be more mistaken. What you see here are the elements required to enable hours and hours of spiromaniac fun.

And here's how you do it!

Download and print the .pdf called Simple Saturday Circle of Fun!

Here I chose a 12 dot-distant pattern.

Begin your Spiromania drawing by choosing a dot for a starting point. Your design is created by connecting dots that are equal dot-distant apart. So, decide on the number of dots you'd like to establish your spiro pattern. Use your ruler to guide you and draw a line connecting your dots. There! You're established your unique Simple Saturday Spiromania pattern.

Okay, now shift your ruler one dot to the right of your first and second dots and draw another line.

Repeat.

And repeat.

And repeat...

And then...guess what?

Repeat until all of the dots have been connected twice!

Will you check this out? This Spiromania drawing is so blooming cool!

Why stop now? Let's spiff up our drawing by coloring in the triangles and trapezoids created by the dot-connecting-lines.

Rulers. Geometric terminology. Measurement. Quantitative awareness. Teachers, can you smell some teachable moments? I do.

Pals, get creative with this, won't you? Here I made one a 15 dot-distant-alternating-pencil-color-pattern. Cool, huh?

Once I got into it, I just couldn't stop myself. I went ahead and added another layer using a 5-dot-distant-solid-color pattern onto my original pattern. 

Alas, the time has come for me to gather up my pencils and put away my ruler. Double-dot-drat! Making Simple Saturday Spiromania drawings are so much fun I just hate to stop.

Sigh...

Simple Saturday Prep: Spiro-mania!

 Mesmerizing...don't you think? Talk about a quiet, simple, yet satisfying activity. Making one of these spiro-delighful drawings is the bomb!

Don't have one of those jazzy Spirograph toys? Well, don't you worry one little wiggle, my friend. Tomorrow I'll show you how to create your own Simple Saturday Spiro-manic drawings sans that expensive toy.

 All you'll need is to download the .pfd I have linked to tomorrow's post, some colored pencils, and a ruler. That's it!

So tomorrow, find yourself a serene little corner and get ready for a ton of line drawing, pencil coloring fun!

Now where's that pencil sharpener?

Simple Saturday: Pansy Power Fingertip Puppets

Remember yesterday when I told you about the happiness I felt when I stopped to observe that chorus of cheery monkey-faced pansies shimmying in the wind? Well, it appears that I'm not the only one who derives pleasure in those colorful treasures. Check out what www.herbs2000.com has to say about my pal the pansy.

A pansy derives its name from the French word pensée which literally translated into English denotes ‘thought’. The herb was so popular in Europe that even Shakespeare mentions about it when Ophelia refers to pansies as ‘That’s for thoughts’. Interestingly, in the conventional ‘flower language’, the three colors of the pansy flowers stand for three different things. For instance, purple, while and yellow stand for memories, loving thoughts and souvenirs respectively. And what is noteworthy is the fact that all the three terms bring a sense of comfort and ease to the heavy hearts of separated lovers. Hence, pansy is also often known as the ‘heartsease’.

That's right. Me and my old buddy Shakespeare...we know a good thing when we see one. Enough of the history lesson. Let's make a Simple Saturday Fingertip Puppet! I know you can't wait. I can see you sitting there right now with your construction paper, tape, scissors, and waterproof markers in hand. Let's get after it!

 To begin with, let's use the markers to draw the pansy's center and its stem along the inside of one of your fingers. I used my pinkie finger. You can chose which ever one you'd like to. Heck, use all 10 of those digits, if you'd like!

Next, draw 5 petals on the construction paper and cut those heartshaped darlings out.

Next is the tricky part. Tape the petals around your fingertip. After a tiny bit of pansy petal shading...ta da! You have made a Simple Saturday Pansy Power Fingertip Puppet! Isn't that the cutest thing you've ever seen?

Hey...you know what? I think I'm going to replicate the pansy chorus and make a pansy puppet on each of my fingertips. Yeah...that's it.

All right, y'all... I'm offically inspired. For now, my friend, for the sake of time we'll have to settle for this solitary bloom. BUT keep your eye on this post. 

Get set for an update... a plethora of pansies!

A pansy party!!!

Simple Saturday Prep: Pansy Power Fingertip Puppets

Behold my most favorite flower...the pansy -  also know as Monkey Face. So lovely.

A few months ago I stopped to appreciate a large cluster of these treasures which lined the edge of the shopping center sidewalk. They seemed to be dancing in the warm summer breeze. It was like those vividly colored monkey faces, all turned my way, were cheering me onward.

"Hurray for you, Debbie! Hurray! Hurray!"

Tomorrow, let's replicate my pansy cheering section. What do you say? Gather up some brightly colored construction paper, scissors, tape, and water color markers and I'll show you how to make some Pansy Power Fingertip Puppets.

Hip! Hip! Hooray! 

Simple Saturday: Fingertip Puppets


Super simple. 

Super sweet.

Simple Saturday Fingertip Puppets.

Remember the short supply list? An index card, scissors, and a marker?

  All you have to do is draw a picture of your puppet. The two nickle-sized circles at the base of my drawing will be cut out leaving a nice place for my fingers to slide right in. That's it, my Simple Saturday friend. I told you it was easy.

Got some kiddies to keep summertime busy? Suggest that they draw a family of puppets.

A plethora of Simple Saturday Fingertip Puppets...that's it.

They should stay busy for a long, long time.

We hope.

Simple Saturday: Beaded Daisy Chain

Meet my utterly delightful Canadian second cousin Lorry Mackay a.k.a. Sals or Sally (Don't ask why she maintains a secret identity. It's a family thang. Shhh.).

Isn't Sals a cutie? And check out the charming daisy necklace she's wearing. Great, isn't it? Want to make one with us? Well, then...let's get busy.

Did you gather the supplies? The glass seed beads, scissors, and either thin fishing line or the cool stretchy thread that can be bought at the craft store?

Lean in close and I'll tell you a Simple Saturday secret. I went ahead and bought that fancy stretchy cord because I hoped that Sally would enjoy making Beaded Daisy Chains with me and want to make lots of them for her friends. She did. We did. It's all good.

Here we go.

To begin, cut a 3 foot piece of thread from the spool. Slip one bead on the thread. Secure the bead to the thread by tying a few knots around it, leaving about 2 inches of the thread at the end.

Then thread 10 beads on the string. I call these beads the 'stem'. You can call them whatever you want to.

Now thread 6 petal beads onto the string. Next, loop the end of the thread all the way around the cluster of petal beads. Insert the end of the thread into the back side of the first petal bead.

Ready for the inside of the daisy? Okay, slip a bead onto the end of the thread. Stay inspired. You're almost there! 

 Now take the end of your string and slip it into the 4th bead in your daisy cluster.

 Go ahead and tighten the beaded daisy snug up against the end of the stem.

There! You did it!! All you have to do now is repeat the pattern all over again and again and again and again... Nothing to it.

If you prefer to make a shortened version to begin with a nice little bracelet is always nice.

Really...once you get the hang of making Simple Saturday Beaded Daisy Chain necklaces, you just can't stop. They're that much fun to make. Isn't that right Sally/Lorry/Sals? So good to see you, sweetheart.

Simple Saturday Prep: Beaded Daisy Chain


He loves me.

He loves me not.

He loves me.

He loves me not.

What the heck! Why waste time on this silly waffling game when we can be productive making Simple Saturday Beaded Daisy Chains, right?

For tomorrow's fun we need small glass seed beads, scissors, and either thin fishing line or some stretchy clear thread. I went ahead and bought some at the craft store.

Regarding whether he loves me or loves me not...dude, I don't have time to worry about such things. For real.

Don't you agree?

Sheesh.

Simple Saturday: Friendship Bracelets

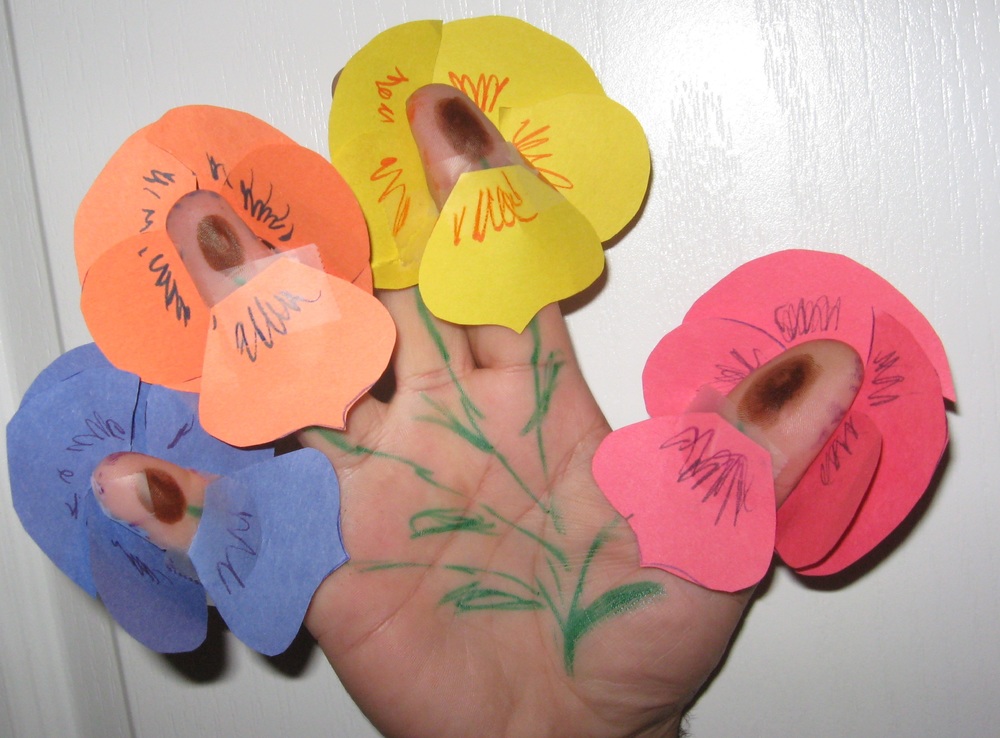
You just have to grin when looking at these three happy sun-worshippers, don't you? I have no idea who these BFF's are. I just like the smiles on their faces. They look like the type that would make Simple Saturday Friendship bracelets for each other, don't you think?

Speaking of bracelets, did you get the 3 colors of embroidery thread, scissors and tape? Okay then, let's give these giddy gals something to giggle about!

Cut a long piece of each thread color. How long, you ask? Well, for our first practice run, I'd cut each piece about 2 feet long. Once you get really good at making these you can cut longer pieces of thread. For now, let's keep it short...okay?

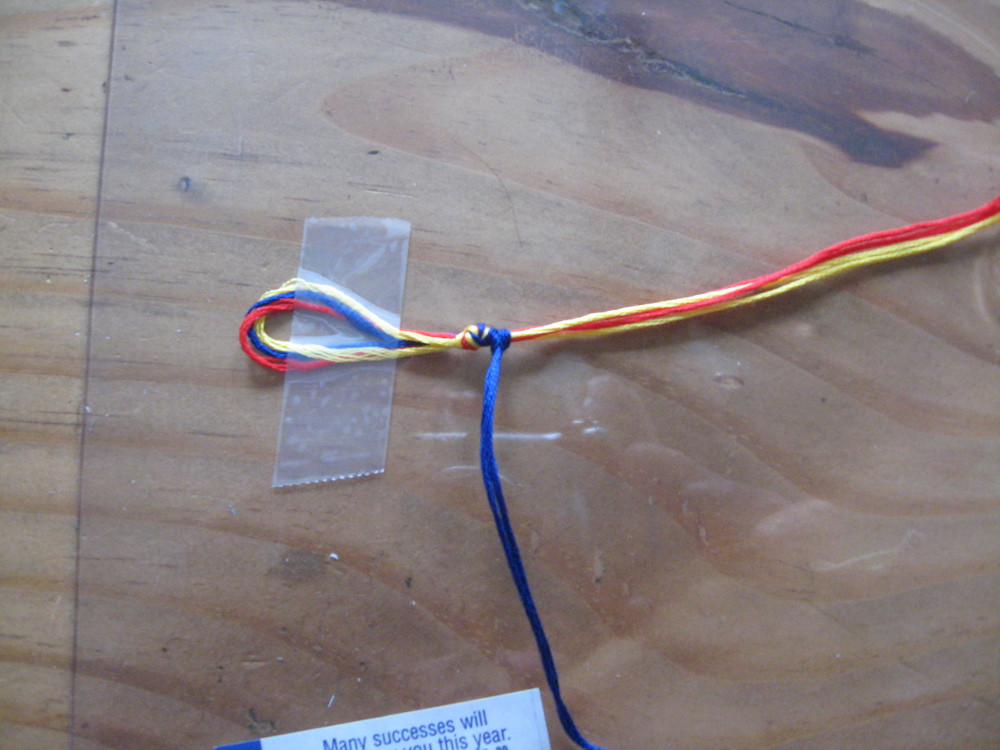
Group your threads together. Fold them in half and tie a knot near the halfway spot loop. Secure the loop to your tabletop with a piece of tape. Now we're ready for the fun part.

Choose one color to begin knotting with. This thread is called the knotter...smart, eh? As you can see, I chose the blue thread for my first knotters. Smooth the other two colored threads together like I did with my yellow and red threads. These straightened threads are called fillers.

See how I layed the blue thread in a 'u' over my red and yellow threads? You go ahead and do that with your knotter.

 Now, tuck that knotter thread inside that loop you formed with the 'u'. See? Like I did?

Then carefully tie what is called a half hitch by tightening your loop around the fillers. Bring the knotter all the way to the original big loop. Smooth it flat and you, my friend, have made your first half-hitch knot! Woo Hoo!

Okay now...I made 5 half-hitch knots in a row with my blue thread. Then, I decided that I wanted to change knotter color from blue to red. It's easier than you think. Trust me.

All I did was join the blue thread with the yellow thread, making them both the fillers now. Then, with my red thread, I made the 'u' loops, tucked the thread into the 'u' loop, and tightened the half-hitch knot. In short, I simply repreated the process with my red thread. No problem...right?

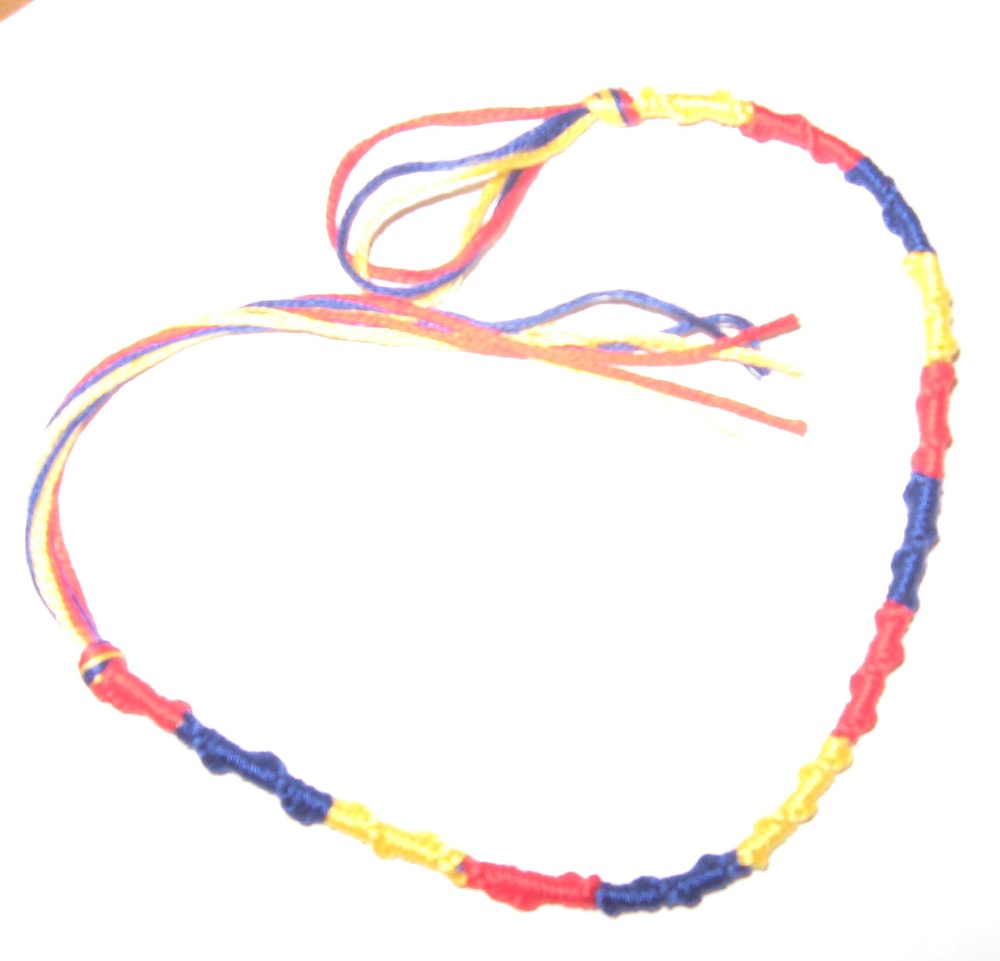
After making 5 knots with my red thread, I repeated the whole banana with my yellow thread! Can you see how the pattern is created? Easy enough, right?

 After you've had success making a few shorter bracelets you're ready to graduate to the longer version. I'm busy making a longer one as we speak.

However, I tried to tie my practice Simple Saturday short bracelet on Tripod, but he was having none of it. Though brokenhearted, I told him in the most aloof tone I could muster, "Be that way, dog. Be that way."

He answered me with a long, wet lick.

Yuck! That's a dawg for you.

Anyhow, click on this link to see the long bracelet that I made for my bestest buddy in the world...YOU!

Now, go out there and have a super Simple Saturday, pal, and I'll see you back here next weekend.

Simple Saturday Prep: Friendship Bracelets

There is nothing finer in this world than having a best friend. Someone to laugh with, cry with...heck...just be with.

Hey...let's make our best buds a little something to show just how much we care for them, want to? How about a bracelet? Or maybe a little something colorful to tie around their ankle? How about it? Just a little something to remind them just how much we love and appreciate their playing such an important role in our lives. 

Here's what you need to gather up for  tomorrow's BFF fun: three colors of embroidery floss, scissors, and tape. That's it!

Be thinking of who you want to give this bracelet to. Tomorrow, as we twist and tie the threads together, let's think of all of the good things we love about our pals.

Don't worry. Friendship bracelets are easy to make. Your BFF's will love them almost as much as they love you!

Simple Saturday: Lucky Ladybug Bingo

 Before we get to our Simple Saturday activity, I want to chat up this first book on the Princess Posey series. It is cute, cute, CUTE!!!! So cute I just had to buy a copy for my great niece. This book is PERFECT for a child who is about to take those big-big-big steps into the scary halls of First Grade! Believe me.

Y'all, I just have to brag on my pal, Steph. She's such a great writer that girl has gone and got herself a great starred review in The Horn Book. For real! Dude, that's no literary chump change...I'm telling ya!

The activity we're borrowing today comes from the guide written for the second book in this series called Princess Posey and the Perfect Present. The only real bummer here is that we can't buy this book until March! Darn it all.

Here. Click on this link and download the Lucky Ladybug Bingo Game and then I'll tell you how to play.

Prepare game board by printing pages on cardstock or copier paper. Cut out the nine Ladybug Bingo game pieces. Cut out the nine word labels.  Conceal the words on the labels by folding the paper strips in half.   Place folded strips in a small box or basket.

 To play the game remove a folded strip from box or basket. Encourage your wee one to read the word printed on the strip. On the game board, find the picture of the object written on the folded strip.       Cover the picture with a ladybug game piece. When all of the pictures have been covered by ladybug game pieces, remove them and begin again! If you'd like to, go ahead and print out a few game boards and play with your friends. The more the merrier!

Let's fly away home and have a little lucky ladybug fun, shall we?

Speaking of flying home, I'm on my way, John. I've missed you so!

Simple Saturday Prep: Lucky Ladybug Bingo

Tomorrow's Simple Saturday activity is designed with the early reader in mind.

It's actually a game I designed as part of a Teacher's Guide for a charming chapter book written by my good friend, Stephanie Greene . The book's title is Princess Posey and the Perfect Present. Even though this darling book won't be released until March, I thought that we'd go ahead and play one of the games found in the guide now.

It's summer. What the hey, right? 

Tomorrow all you have to do is download a .pdf I'll attach to the post. If you'd like to print on cardstock instead of copier paper, that'd be great.

So, get yourself some scissors, your reading specs and we're in lucky ladybug business!

Simple Saturday: Pizza Swan

 Let's make a swan sans feathers, shall we? All that is needed is a leftover piece of pizza and a sizable piece of foil. What size, you ask? Oh...about 18 inches or so will do just fine.

Before we go any further, I have to give credit when credit is due. My daughter taught me how to make pizza swans. You see, these featherless creatures are tricks of her trade. Rock on, Homeslice. Rock on!

Let's begin. Cut an 18 inch-ish piece of foil from the roll. (Doesn't that pizza look just yum?)

Lay the pizza with space between the crust and the end of the foil strip measuring about 1/4 of the strip.

Working from the pizza point, fold the foil alongside the sliced edge of the pizza. Repeat this folding procedure along the opposite side of the slice. Now you've got a nice moldable strip of foil extending beyond the point.

 So, just bend and shape that remaining strip of foil into a swan's lovely neck, head, and beak. The remaining foil fanned out at the rear crustside won't go to waste...don't worry. Simply crease the foil upward, fan it out and....wha-la! You have made a swan tail.

  Notice the swan-like similarities?

Now that we've finished, let's talk about dinner. What are you in the mood for?

Me? You guessed it!

PIZZA!!!!!

Simple Saturday Prep: Pizza Swan

What do a piece of leftover pizza and a swan have in common?  Well, check in tomorrow and I'll show you what.

To have a swimmingly good and super simple fun time you'll need a piece of yummy pizza and sizeable piece of foil. That's all, my dear Simple Saturday friends. 

So give Dominos a dial. Prance on out to Pizza Hut. Better yet...if you live in Austin, hop down to Homeslice, the originators of the pizza swan. While you're at it, I'll take a slice of sausage and black olive.

Thin crust will be fine.


Simple Saturday: Sunshine Picasso

 All we need for hours and hours and hours of summertime fun is a hot sidewalk, a bucket of water, a cheapo paintbrush and thee!

The trick with this project is to work    f-a-s-t! Just paint with water on the sidewalk. That is it! You can't go wrong, either. If you're not pleased with the final product, just wait a few seconds and your sidewalk canvas will come clean in no time!

My little next door neighbor friend got in on the action. I have to tell you, she just could-not-STOP! Check out her snazzy Picasso-like techniques.

She started small with a clever self portrait.

After a little while her inner artist took over! She discovered that her canvas was as limitless as my driveway and she took full advantage of the unending space. Oh, my...it was absolutely endearing to watch her fully engage in the utter simplicity of this activity. Truly. 

 I chuckled she ran to reload her brush with water in effort to extend her artistic line. My sweet friend had to hurry because she knew that the linear expression of her Inner Picasso was short lived. Soon the sun would erase its essence and she would have to start all over, once again.

Oh, well...what the hey? Its only water, sunshine, a pleasurable moment, and joyful youthful artistic expression...essential elements of a happy child enjoying the delights of a summer day...right?

Parents, let's strive to balance simplicity and complexity this summer, shall we? Shut down the electronics for a little while and enjoy the simplest of things...water, sunshine, and...as demonstrated by my neighbor...the charming nature of your precious child.

Let's have a super Simple Saturday summer, what do you say? The best ever!

Simple Saturday Prep: Sunshine Picasso

Who needs a bunch expensive oils and pastels to tap into our inner Picasso. Not us, the Simple Saturday team...no way!

Tomorrow, along with your creative left-brained self, gather up a paint brush (any size) and a bucket of water. Yeppers...believe it or not, that's all we need.

Sunshine Picasso just might be the simplest of all Simple Saturday activities we've done together. The Mother of All...

Simple Saturday: A Spider Web Hunt

 One very important thing to remember about hunting for spider webs is to spend some quiet time observing our eight-legged friend. Admire how tenacious he is, and so patient. Wow. They're amazing creatures.

Let's gather up our supplies - the black construction paper and hairspray - and head out to the backyard where a busy little creature has woven several webs on one of my flower pots. Smart fellow, isn't he?

Notice in the picture that I also grabbed a white pencil and an extra sheet of construction paper? The follow up activity...remember? 

Let's go out in the backyard, shall we? I'll show you a really cool web.

Can you see it?

Look close.

Closer.

Closer.

Well, trust me. It's there.

Now, spray your black construction paper with your hairspray. Make it good and sticky.

Next, lay the sticky construction paper right on top of the spider web. Be bold. Lay it right on top. Hold the construction paper still for a few seconds giving the web a chance to adhere to it.

Okay...carefully lift the construction paper and look! The web has stuck to it! It is very hard to see those lovely, thin silky threads in this picture, but they are there...Gorgeous.

 And, for the follow up activity, grab the other sheet of black construction paper and white pencil, sit yourself down and watch little ol' Spidy rebuild the web.

 That's all there is to it. Easy peasy, right?

I do hope that throughout the summer you often spend time in nature. Take walks. Observe bugs. Lay on your backs in the thick, lush grass and just lose yourself in cloud watching.

Remember, simple things are the best!

Simple Saturday Prep: A Spider Web Hunt

I am eternally fascinated with the magical qualities of spider webs, aren't you? So fragile, yet so strong.

Well, I've had my eye on a busy spider who has nested in one of my backyard flower pots, marveling at how industrious that little critter is. If a rainstorm wipes out his sticky home...no problem...he's back at it in no time rebuilding that thing. That is why I feel tomorrow's activity will not ultimately harm the little guy. Oh...he might tap one of his eight appendages in a little spidey huff. Don't worry. He'll get over it.

So, for tomorrow's Simple Saturday activity here's what you need...a sheet of black construction paper, some hairspray, and a spider web.

If you'd like to do a fun follow up activity go ahead and get yourself another sheet of black construction paper and a white pencil or piece of chalk. 

I'd best be going. I have to find out why, for some frustrating reason, my website will not let me upload photos.

Maybe it has a bug in it.

Ooooo...what if there's a spider in there? Yikes.

Simple Saturday: Super Simple Pinwheels

I promised you a super simple activity and, my friend, this is one. Simple Saturday Super Simple Pinwheels are a blast to make. Let me show you how.

Remember the list of pinwheelie stuff you need to gather? The sheet of copier paper, a sharpened pencil with a meaty eraser tip, a handful of washable markers (optional), a straight pin, a small plastic lid, a ruler, scissors, and tape? If so, you're ready to spin. Let's do it.

Measure and cut an eight inch square of copier paper. Using the straight edge of the ruler, draw a line from one alternating point of the square to another. When finished, you would have drawn a big X on the pinwheel paper.

Next, lay the small plastic lid over the center point of the lines. Trace around the edges of the lid. This circular line is pretty important to your pinwheel success as it identifies the 'stop cutting here' mark. Go passed it and it's pinwheel doomsday, my friend.

At this point, should you desire to get all colorful and creative, go for it. Jazz up your pinwheel to your little heart's content. I resisted the urge because I thought the instructional pictures might be more easily understood if I didn't. Besides that, I was under a little bit of time crunch to get this post out. TMI? Probably.

After you colorfully express yourself, it is time to put this puppy together. Moving from the square's outer points cut on the diagonal line toward the circular stop-cutting-here-warning line.

Here comes the only tricky part of the project. Once you've made your cuts, being careful not to make a crease in the paper, fold alternate triangular tips onto the the circle's center point. Go ahead and use a tiny bit of tape to hold the tips in place.

Note: Use tape sparingly because we want to keep the pinwheel as light as possible. It spins better that way. Trust me. Have I ever steered you wrong? On second thought, maybe you better not answer that question.

Okay, with straight pin and meaty pencil eraser in hand, stick the pin through the pinwheel center point. Now see the sharp pointy part of the pin sticking out in the back? Go ahead and poke that baby all the way through the eraser. To assure that you won't get pricked while having that good ol' pinwheelin' fun bend the pin so that is flush against the metal eraser rim and cover it with a piece of tape.

And there you have it! A Simple Saturday Super Simple Pinwheel! To make it spin you can either stand in a breeze, position yourself in front of an air conditioner vent, or do just what John's doing here and blow into the pinwheel's curved folds. He's such a big kid, isn't he? He's having so much fun he can barely hold back a smile. See that?

But wait...

What in the world is that dark thing growing out of the top of his head? A unicorn's horn? An antler?

Good thing the pinwheel's not secured to that mysterious knob or he just might take off in flight!