Simple Saturday: Autumn Leaf Potion

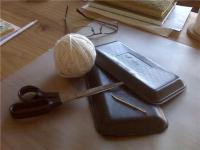
Got the supplies? The small bowl, rubbing alcohol, white coffee filter, a green leaf, and a spoon (not pictured...sorry.) Let's get started.

First, tear the leaf into small pieces. Place the pieces in bowl. Use the spoon to smash the leaf, trying to squeeze as much juice from the leaf as you can.

Next, put about about two spoonfuls of rubbing alcohol in with the smashed leaf juice mixture. Continue to smash and stir. Let the leaf juice/alcohol mixture set for a few minutes. When the once clear alcohol becomes a nice green color your Autumn Leaf Potion is ready for experimentation.

Okay...dip a corner of the white coffee filter into your Autumn Leaf Potion. Soak up a good bit of the potion and then set the filter aside to dry. If you're like me, it is hard to wait for the potion soaked coffee filter to completely dry. Be patient, Mr. Mad Scientist. Be patient.

Once that coffee filter dries, look super closely at the leaf potion stain color change. See the trace of gold at the wiggley edge of the leaf potion stain? That's what my leaf becomes in the fall....a nice yellowish gold color.

Now, like I said earlier, my options for finding leaves that change into vivid fall colors are slim-to-none and yet, my experiment was successful! And my experiment was done with a whimpy little leaf. What if you did this with a big, fat, full, wonderful New England leaf? One that turns orange-red? I can tell you right now...with a good leaf like that your experiment will turn out tons better than mine did. I promise.

What does this experiment tell us about the changing colors of autumn leaves? Here's  a good quote from a web site called Science Made Simple (great name...don't you think?) explaining what happens to make leaves change colors. The real question is....do they really change?

Winter days are short and dry. Many plants stop making food in the fall. The chlorophyll goes away. Then we can see orange and yellow colors. These colors were in the leaves all summer, but the green covered them up.

Some leaves turn red. This color is made in the fall, from food trapped in the leaves. Brown colors are also made in the fall. They come from wastes left in the leaves.

How about that? The fall colors are inside of those leaves all along! Even when they were green. Simply amazing, don't you think?

NOT a picture of my backyard. Yours? Then go out there and gather up some leaves!!!! 


Simple Saturday Prep: A study of autumn leaves

I love this time of year, when the leaves change from a deep green color to gold or red or vivid yellow. Have you ever wondered how this happens, how leaves change color? Tomorrow why don't we do a simple little experiment to see how this phenomena takes place.

The supplies you will need will be a small bowl, a spoon, a white coffee filter, rubbing alcohol, and a green leaf. Now, where I live in Round Rock, Texas there are 'slim-pickins' for big, broad leaves that change into vivid colors. (I live in a new housing development where the trees in our yards are similar to the one Charlie Brown chose for his Christmas tree...skinny.) If you can find some nice maple leaves or Bradford Pear leaves that'd be good. If you can't that's okay. We'll make it work.

Gather up some leaves and I'll see you tomorrow!

Simple Saturday: Meat Tray Sewing Cards

Okay, I said simple and I mean it. And, as it goes with kids, the simpler the better. Wee ones love this activity. I promise you. You've got the supplies, right? The Styrofoam meat tray sans the meat, yarn, tapestry needle, and scissors? Well, let's get going then.

Cut the tray into strips. I made mine about 2 inches wide to accomodate my fat fingers. You can make it thinner, if you'd like. Size up your child's fingers and then go for it.

If you look closely you can see that I poked a row of holes into the Styrofoam strip. You might want to make your pokes a bit bigger. Once again consider the child and their developing dexterity. Make larger ones if they are wobbly sewers. Make them smaller if you'd like to challenge them a little bit.

Tie one end of the yarn to the sewing card and tie the other to the tapestry needle. Securing the yarn to the needle assures that the concentration focus will be on the act of sewing and not on keeping the dad-burned yarn on the needle. Voice of experience here. Heed it.

And then sew! In and out. In and out. Over. Under. Over. Under. Fill that card with yarn. Pull it out and sew it all over again.

I know what you're thinking. That's it? Yes. That's it. In our harried, plastic, expensive, scattered adult world we forget that what kids need most is simplicity. Pare things down. Relax. Enjoy a simple moment with your lovely child and sew.

Have simply sensational Saturday and I'll see you next week.

Simple Saturday Prep: Something Beneficial for Little Goblins

Nothing in this milk-chocolatey-wonderful world is more endearing than to observe tiny hands at work. Those busy little dimpled knuckles, chubby mini fingers...delicate, yet so purposeful in their discovery. Scenes like this stop me in my tracks. I deeply admire a wee one's deliberate focus as they hone their dexterity. Plus, they're so darned cute!

Saturday we will be developing the strength of those tenacious fingers, lengthening that concentration span, and spark a little bit of independence. The simple activity is designed for children from say...three years old and up. You're going to need a couple of styrofoam meat trays, yarn, scissors, and a tapestry needle.

Now I scavengered my needle out my knitting bag (I'm the worst knitter that ever walked this planet. Yet I keep at it. A glutton for punishment, I guess). You can pick up some plastic ones at a craft store, if you'd like. Just remember to keep it simple, cheap, and FUN!

See you tomorrow.

Simply Silly Saturday: Cardstock Mustaches

Jimmy Buffett, eat your heart out. Dig my pencil-thin mustache.Who would have known how much fun a kid/woman could have with index cards, a marker, scissors, and a nose? I have been laughing my belly button off making these goofy mustaches.

Creating cardstock mustaches is super easy to do. On your index card, simply trace your desired mustache shape. The only tricky part is  making the tiny nostril hooks fit just right. Make them too small and they'll pinch a little. Make them too wide and your stash won't stay.

Because I don't want you to waste much time fretting over your stash formatting, I have made a .pdf template of these mustaches that fit me just fine. Hope this helps jump-start your stashing good time. (Warning. In keeping with the Simple Saturday theme, the template is very simply made. Professionals, turn the other way. We're just having some silly fun here.)

What's up, Doc? Look at this funny mustache! Check out the Bugs Bunny teeth. Isn't that a crack-up?

I would LOVE to see what you come up with. I'll bet your mustaches will be mega-tons better than mine. Send me some pics of you and your stash. They're sure to be hilarious!

Email me, if you'd like, at debbadee5@gmail.com.

Long live Simple Saturday silliness.


Simple Saturday Prep: Fuzzy-Faced Disguises

Need to assume an alternate identity? Blend into the scenery? Keep a low profile? Slip away in the shadows? Well, what you need, my sleuth-like friend, is a fuzzy-faced disguise and tomorrow I'll show you how to make one.

For your simple supply list all we need are index cards, markers, scissors, and your charming little nose. Fake fur or fuzz of any kind is optional.

With Tripod the Fur Shedding Machine it will be easy for me to gather up plenty of fuzz around here. Need some?

Simple Saturday: A Fraction War

Fractions can be deadly...well, tricky anyway. Just think about all of the wacky rules involved in computing with them entail. The larger the denominator the smaller fraction. Two fractions with completely different numerators and denominators can be equal. Now, how the heck can that be true? Don't even begin to talk about reciprocals or improper fractions. And then, on top of all of this, we have to reduce these babies? Fractions aren't playing fair, and that's all there is to it.

Years ago I worked at a school for at-risk high-schoolers, I loved that job. I clearly remember sitting beside with an ex-gang member with a tear-drop tatooed at the corner of his eye and the words 'love' and 'hate' tattooed on the flesh between his scarred knuckles and finger joints. As I presented the notion of reciprocal fractions, I noticed the hand clenching his pencil wasn't not the one with 'love' printed on it.

Gulp.

 After we spent a good bit time talking about the mental gymnastics behind working with fractions and playing my game, my decorated pal began to understand the illogical logic behind computing with fractions. The scowl behind the teardrop tatoo softened. "Is that all there is to it?" he asked. I answered, "Yep. That's it."

So, let's you and I play Fraction War.

First of all gather up some index cards and a marker.

Next, write a random sequence of fractions on the cards keeping in mind what your intent to comprehend might be with the game. Do you want to grasp the notion of the simple value of fractions? What is 1/2 as compared to 1/9 and so on? (Note: It may be helpful to have fraction manipulatives available to use when initially working with concepts such as these. There is no shame in your game if you need to concretely double check the abstract, illusive, and down-right-hard-wrap-your-head-around value of these wacked-out fractional representations. Say what? You're telling me that 1/12 is smaller that 1/5? How can that be? Five is smaller/less than/littler  than twelve that last time I checked. Well, check again. We're talking fractions, bro.)

So, after you've made a pack of cards....25 or more...you're ready to play. Decide with your partner whether you're going to play 'High' or 'Low', which mean that the larger fractions take the deck or the smallest ones cleans up. Just be sure that you agree about the rules of the game before you begin. (Believe me. This is the voice of experience talking here.)

Uh, oh! Like the regular game of War, you might hit a stale mate, that is when the players have pulled two cards of equal value, or 'equivalent fractions'. In the picture 4/8 is equivalent/equal to 1/2. If that happens (and it will, hence the name WAR!) the players should proceed to draw three extra cards from their stack on hand and place them face down from their stack.

And then flip the next card in their stack on top of the faced down group already on the playing table. In this case, if we had agreed to play 'High', the 1/8 would take that stack because 1/8 is bigger than 1/9.

The more cards you make, the longer the game takes. If you really want to challenge yourself, create an assortment of fraction cards with tenths, hundreths, and thousandths as denominators to be paired against decimal cards of equal value. It also great fun to play with improper and mixed fractions in the stack.

Yeah, I can be quite sadistic when it comes to fractions. I really like working with them. Blame it on Fraction War!

Simple Saturday: Math fact memorization game

Got the goods? A few index cards, scissors, a pencil, and your brilliant brain? That's all we need to get going.

What math facts are you studying at school? Is your teacher constantly 'suggesting' that you practice with flash cards at home? How about we make a math a portable game that we can use just about anywhere? How does that sound?

All you do is draw a curve on the index card. (I used the edge of a cd for a guide.) 


Cut 9 notches on the edge of the curve. Write a numeral and a function in the center of the notched card. (I wrote X 6. I'll be multiplying the other numbers by 6.) Label each notch with a random, non-sequential number.  


 Flip the card over. (There will be much flipping over when making these, hence the reinforcement of math facts.) On the back side of a notch write the correct answer to the corresponding math fact. For instance, on the back of the card near the notch labeled as '4' I wrote the number '24' because 6 X 4 = 24.


Now let's play. Have someone hold up the card with the front of it facing you. Place a pencil in the notch. On our card, the pencil is placed on the '8'. So... 6 X 8 equals what? 48! Are you sure? Turn the card over to see if you got the answer correct. Yay, you!


Remember I told you that this math fact game was so easy a three-legged dog could do it? Let's quiz Tripod to see if my statement is true.

Tripod, what is the answer to the equation 5 - 2?           "3!"

Good, Tripod! How about 2 + 1?          "3!"

Great! Try this... 3 X 1?          "3!"

Oh yes, you're doing so well. Here comes a toughie. Can you reduce 18/6?          "3!"

Good dog, Tripod. Good dog.


Parents, it has been my experience that in the simple act of making these game cards the child experiences a great deal of math fact review. They must check and re-check the correctness of the equations in order to make this work. Once the cards are correct, you might like to allow them to decorate their fine work with small stickers or cool gel markers. Correct math facts first. Cool stuff after. (I'm so mean, aren't I?)


Simple Saturday Prep: A math memorization game so simple a three-legged dog can do it!

Tomorrow's plan is to take the pain out of memorizing those dad-burned math facts. It doesn't matter what you are studying at the moment...subtraction, multiplication, decimal equivalences...you name it. We can handle it. Tripod, my devoted canine companion, has volunteered to be tomorrow's lab rat. (I told him that there would be treats involved.)

All you need is a few index cards, scissors, pencil, and your brilliant brain. Get ready to hammer those blasted math facts in a really fun way.

Tripod's ready. Are you?


Simple Saturday: The Play Dough Bandito

Got everything? The 4 cups flours, 1 cup salt (I cut the recipe down. Watching my salt intake.), 1/4 cup oil, 2 tsp. cream of tartar, 4 cups water, food color, and fragrance? I used lemon extract.

 All right. Let's go.

Measure out 4 cups of water. Add a generous dose of food coloring and fragrance into it. You'll need the generous dose of color to be certain to alter the white-white-white of the flour/salt mixture.


Combine half of the flour/salt/cream of tartar mixture in the pan. Go ahead and have the remainder of the ingredients on hand to add, gradually to the mix as it is cooking. This method helps to avoid lumpy play dough...Nothing worse.

Oh...what was that? Did I hear a horse galloping outside? Surely not...Now, where was I?

Put half of the mixture on the stove top over medium heat. Stir. Stir. Stir. Stir. Gradually add the remainder of the ingredients, all the while stirring like there will be no tomorrow.  After about 5 minutes of muscle building stirring the mix becomes a wonderfully fragrant pliable blob.

Oh, my! How strange. There's that clop-clop-clop of a horse again. Hmm. I'll check outside after I'm finished making play dough.

Once your playdough has bonded, plop it out on the counter top and knead it.  Be careful because it is quite hot. It needs to be kneaded now to assure the best and smoothest consistency. Go head. Plunge your fingers into it. Roll it around on the counter top. Have some simple fun.

And behold! We made a terrific batch of fantastic yellow play dough. See how moldable it is? Do you like my clever bowl of play dough lemons? 

The nicest thing about this homemade play dough is that it will last forever if you store it the refrigerator in an air-tight container.   

CRASH! BANG! BOOM!!!!!

What in the world?????

Oh,  no! It's him!!!!

 It's the Play Dough Bandito!!!!!


Simple Saturday Prep: Home-made Play Dough

I dug through an old recipe box to unearth a fossil. Here it is.  My well-loved recipe card for home-made, range-top play dough, the corners of which are  brown with age. Oh, yes...

We're going to need flour, salt, oil, cream of tartar, water, and food coloring. If you'd like to add a scent to the mix, dig around in your spice cabinet  for either vanilla, peppermint, or banana flavoring.

See you tomorrow!


Simple Saturday! Macaroni Gems

Doesn't John look dapper wearing my snazzy macaroni necklace?Did you gather the supplies? The macaroni with big holes, food coloring, rubbing alcohol, plastic lunch bags, string, and paper towels? Now follow these very simple, yet-can-be-a-bit-messy, instructions and you will make beads lovely enough to wear to the prom.

To play it safe, go ahead and spread out the paper towels first. Make them at least two or three ply thick. (If you would rather not use paper towels, newspaper works just as well. While it doesn't absorb as quickly, it serves as a perfectly suitable drying surface. You'll see what I mean in a minute.)

Grab a handful of macaroni and put them in a bag. Squirt 8 or 9 hearty drops of food coloring on the macaroni. Next, put a capful of alcohol in. 


Zip lock the  plastic bag. Squish the macaroni-food coloring-alcohol mixture around until all of the noodles are saturated.


Lay the beads out on the paper towel to dry.

Repeat process with all of the other colors. After, oh...say...15 minutes you'll have some fantastic beads!!!!! 


I like the way my necklace turned out. It has a has a sort of Native American feel to it, don't you think?

Remember, you can dye any type of macaroni. Actually, my favorite shape to use are the pinwheels.

Oh...how I wish I could see what your necklace looks like. I'll bet it is great.

Simple Saturday Prep: Vividly Vibrant Macaroni Jewels

The Austin weekend weather forecast predicts rain, rain, and more rain. Yes! This Simple Saturday activity is perfectly suited for a damp, soggy rainy day.

I rummaged around the house to gather our needed supplies. Here's the list: paper towels, macaroni with big holes in them, food coloring, plastic lunch bags, yarn, and rubbing alcohol. That's all we need to create dazzlingly stunning macaroni beads. Simply divine!

See you tomorrow.

Simple Saturday: Monster Bubbles

I thought I'd post a bit earlier this week as, perhaps, you might enjoy this activity during your Labor Day family BBQ's. Nothing could be easier and more fun than making Monster Bubbles in the backyard!

Your simple supply list includes: two plastic drinking straws, one 2 ft. long piece of string (this can be modified by cutting it shorter to fit a tiny hand), one bottle of glycerine (I bought mine at CVS, as you can see), liquid dish detergent (Dawn works the best, in my opinion), a rubber bucket or dish pan, and water.

To begin, let's make the most-perfect-yet-super-simple bubble wand to enhance the thrilling Monster Bubble making experience. Simply thread the string through the straws. Knot the ends of the string together and squeeze that knot inside one of the straws. Trust me. This works.

To make the ultimate bubble solution get the rubber dish pan or bucket. Pour about 3/4 cup of Dawn in it and about 1/4 to 1/2 bottle of the glycerine in. Actually, start with 1/4 of the bottle of glycerine...you can always add more later, if need be. (This solution is TONS better than that crummy stuff in the plastic jars. The only thing good about those jars is the fancy wand inside.)

Use the outdoor water hose or a pitcher of water to s-l-o-w-l-y fill the bucket 3/4 full. Let the stream drizzle out the nozzle or you're going to have to wade through a mound of bubbles to get to that burger waiting for you on the grill! Gently swish your hand in the solution to blend the Dawn, glycerine, and water together. The solution should feel wonderfully slimy!

Now, submerge your string wand in the solution. Take one straw in hand and, once again, s-l-o-w-l-y lift it out. The solution should look like a piece of plastic wrap stretched between the strings. If the bubble bond breaks...so what? Do it again. Now wave that dangly bubble wand carefully from one side of your body to the other. Be bold. Hold it out like a banner and let the wind help you. After a few easy tries, you'll make a bubble bigger than the size of your head! Maybe even as big as a basket ball...or a beach ball...or maybe even the planet Pluto! (Oh yeah, Pluto's not a planet anymore. Sorry.)

Well, that's it for this week. Have a simply delightful Labor Day holiday! If you make Monster Bubbles, I know that you'll be squeaky clean all day long.

Simple Saturday: Private Pen Pals

You and your partner must make a pact. A pinky swear to keep a secret to the depths of your graves. Tell no one the deeds you are about to embark upon. You have the note card and pen, right? You need only one card to begin this writing voyage together. However, in the days to come, you'll want to have a surplus on hand to keep this quirky correspondence with one another going.

First you two must decide upon a place for notecard exchange, a sort of 'X marks the spot', if you will. Under a rug? Behind a chair? Near the dog bowl? Hmmmm, probably not. On the bookshelf? Yeah...that's a good idea. Decide on a place where notes can be occasionally hidden. Not every single day, mind you. Our game would get old then. One person writes a note and hides it. The private pen pal sneaks about, snags it from the designated spot, then finds a quiet place to read it. Now it is their turn to correspond!

Write silly jokes, light-hearted comments about work or school, find some specific wonderful attribute to praise, or express your affection for one another. Slip a little flower bud between the folds of the card. Maybe a handmade book mark or a nice piece of stiff, pink, cardboard-like bubble-gum. Simple treasures to be shared. Precious memories to cherish forever.

I have found that this game is particularily helpful when a parent has to travel frequently or shares custody of a child. Playing Private Pen Pals helps to ease the burning ache of absence from one another in a fun, simply silly way.

Warning, parent! This is not a time to lament over invented spellings. For now, enjoy your child's message. We'll work on that spelling later.

Simple Saturday Prep

Is there a child in your life learning how to read or write? One that may be needing emotional support of some kind? Or a child who simply enjoys a good joke? Well, Saturday's activity is one for you.

Do you have a stash of funky stationery? Stuff that you'll never use? Pull it out. We're going to use it tomorrow. The supplies needed for Simple Saturday fun are a note card and envelope, pen or pencil, and a pal to share in the adventure with you.


Simple Saturday: Painted Bread!

Get ready to have some tasty fun. Even though you might not like the ingredients or if food coloring makes you feel a bit wiggly inside, I think you'll have fun making Painted Bread. If you don't want to eat it your toast, give yours to your dog. (My dog Tripod loved the piece I gave to him...just joking.)

Here we are back in my kitchen.Do you have everything you need? Millk? Brushes? Food coloring? Toaster? Bread? I used wheat bread this time. For the optimum Painted Bread color contrast, white bread works best. Oooo...those bright colors against that milk-toast white is breath-taking!

Go ahead and put around 7 or 8 drops of food coloring in each glass of milk. Remember we're using red, yellow, and blue. (Those are pretty special colors with their own important name...primary colors.) Stir the food coloring in the milk using your super clean brushes. Now we're ready to really have some simple fun.

Paint your bread. Go ahead. Do it. Fill those bristles with lots of paint and spread it right on your bread. Use all the colors. Make rainbows, or cars, or hearts, or your name, or anything you'd like. Have a blast!

I must caution you to avoid the urge to saturate your bread with the paint. Soggy bread falls apart in the toaster. Trust me. I have had first hand experience in crummy things like this. 

I bordered the crust with red.Now put your bread in the toaster. Wait for it to toast. (The waiting is the hardest part.) Pop! Out it comes! Awesome! Go ahead and spread some butter or maybe a bit of peanut butter on it and you have a delicious simple feast, my friend.  


What do you think about Painted Bread? Post a comment. Tell me. I'd simply love to know.

Simple Saturday Prep: Painted Bread

This activity is fun, fun, fun and super easy to do! Gather up the following items and have them ready tomorrow morning. You just might like to make Painted Bread for breakfast! Yum.

You'll need:

  • 3 small paintbrushes (Make sure that they are clean. You might want to buy some brand-new cheapies at the craft store...the most inexpensive ones on the rack!)
  • Milk
  • Red, yellow, and blue food coloring
  • A piece of bread (white or wheat, anything as long as it is light in color)
  • A toaster

That's it! See you tomorrow.


Simple Saturday: Invisible Ink

Are you ready? Do you have your supplies? The lemon juice, small paint brush, piece of paper, an iron? Remember that we will want a responsible adult nearby to help out with the iron when it is hot. Let's begin, shall we?


All you have to do is paint your message with the lemon juice right on the paper. That's it! I wrote my secret message for my silly husband, John. Can you see the wet letters of the message I wrote to him? After you paint your lemon juice words, you have to wait a while for the letters to dry. When they dry, your words disappear into the paper. How fun is that? 

Now comes the really amazing part. Have your grown up heat up the iron really hot. Smooth the iron over your message. Wow! Will you look at that? Your message magically appears!


Can you see how surprised John was when he read his message?

Have fun with this. Draw pirate maps with an X to mark the spot where the treasure is buried. Write out messages in secret code. Or simply tell someone how much you love them. Just be sure to keep this simple recipe a simple secret. Shhh.

Simple Saturday: Invisible Ink

Calling all detectives and special agents! Secret messages, here we come.

Gather the following materials and I will show you how to write notes in invisible ink. Keep the recipe concealed. We don't want it to get in the wrong hands, now do we?

Tomorrow you will need:

  • Lemon juice
  • A thin paint brush
  • A sheet of paper
  • An iron (with the help of a responsible adult)

That's it! See you on Simple Saturday!

Shhhhhhh.

(A special note of thanks to master photographer Karan D. Lewis. You're the best!)